
조금 매운맛 10 dart 반복문 (loop)과 로또 프로그램 pt 1
반복문
1) For loop
for(int i=0; i<6; i++){
 print('$i번째 실행');
}
예제1)

void forward(int move){
  for(int i=0; i<=move; i++){
    print('$i칸 이동했습니다.');
  }
}

void main(){
  forward(5);
}
예제2)
void main(){

  List<String> rainbow = [ '빨', '주', '노', '초', '파', '남', '보'];

  for(int i=0; i<rainbow.length; i++){
    print(rainbow[i]);
  }
}
2) For in loop

void main(){

  List<String> rainbow = [ '빨', '주', '노', '초', '파', '남', '보'];

  for(String x in rainbow){
    print(x);
  }
}
3) For each loop
- for in loop와 다르지 않지만 조금 더 빠름

void main(){

  List<String> carMaker = [ 'BMW', 'benz', 'audi', 'Jagua'];


  carMaker.forEach((name){
    print(name);
  });
}
추첨 당첨 번호 프로그램

import 'dart:math';
List<int> lottoNumber(){
var random = Random();
List<int> lottoList = [];
int num; // 생성된 로또 번호 담을 변수
for(int i=0; i<6; i++){
num = random.nextInt(45) + 1;
lottoList.add(num);
}
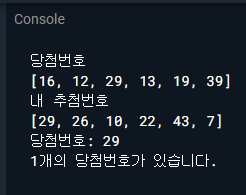
print('당첨번호');
print(lottoList);
return lottoList;
}
List<int> myNumber(){
var random = Random();
List<int> myList = [];
int num; // 생성된 로또 번호 담을 변수
for(int i=0; i<6; i++){
num = random.nextInt(45) + 1;
myList.add(num);
}
print('내 추첨번호');
print(myList);
return myList;
}
void checkNumber(lottoList, myList){
int match = 0;
for(int lotto in lottoList){
for(int mynum in myList){
if(lotto == mynum){
match++;
print('당첨번호: $mynum');
}
//print('로또번호 = $lotto');
//print('내 추첨번호 = $mynum');
}
}
print('$match개의 당첨번호가 있습니다.');
}
void main(){
List<int> lottoFinal = lottoNumber();
List myFinal = myNumber();
checkNumber(lottoFinal, myFinal);
}
조금 매운맛 11 dart 반복문 (loop)과 로또 프로그램 pt 2
이전의 추첨 프로그램엔 문제가 있음
난수 만들때 중복을 허용하지 않도록 해야함
Set
- 형식 : Set<X> x = {1,2,3,4,5,6}
- 중복을 허용하지 않는 컬렉션
- 하지만 중복을 제외하면 결과 갯수가 줄어들 수 있음
예시) 1,2,3,4,5,5 나왔을 때, set은 1,2,3,4,5 까지만 출력함
4) while loop
while(a != 1000){
 doing somethin
}
while 사용으로 변경 추첨 프로그램
import 'dart:math';

Set<int> lottoNumber(){
  final random = Random();
  final Set<int> lottoSet = {};
  //int num; // 생성된 로또 번호 담을 변수

  while(lottoSet.length !=6){

    //numt = random.nextInt(45) +1;
    lottoSet.add(random.nextInt(45)+1);
  }

  print('당첨번호');
  print(lottoSet.toList());

  return lottoSet;
}

Set<int> myNumber(){
  final random = Random();
  final Set<int> mySet = {};
  //int num; // 생성된 로또 번호 담을 변수

  while(mySet.length !=6){

    //numt = random.nextInt(45) +1;
    mySet.add(random.nextInt(45)+1);
  }

  print('내 추첨번호');
  print(mySet.toList());

  return mySet;
}

void checkNumber(lottoSet, mySet){

  int match = 0;

  for(int lotto in lottoSet){

    for(int mynum in mySet){
      if(lotto == mynum){
        match++;
        print('당첨번호: $mynum');
      }
      //print('로또번호 = $lotto');
      //print('내 추첨번호 = $mynum');
    }
  }

  print('$match개의 당첨번호가 있습니다.');
}

void main(){
  Set<int> lottoFinal = lottoNumber();
  Set<int> myFinal = myNumber();

  checkNumber(lottoFinal, myFinal);
}
List.generate
- 형식 : List<int>.generate(10, (i) => i+1);
1번째 인자값 = List의 길이 결정(추첨에선 몇개의 인자값을 만들지 지정)
2번째 인자값은 함수로 받음, List value 숫자들을 생성하는 역할
> List가 1부터 10까지 열개의 숫자들을 생성해줌
- List.generate 함수는 10개 숫자들을 생성해주기에 생성된 번호들을 섞어주기만 하면 됨 >> Shuffle 함수 사용

.. (cascade notation)
: 한 객체의 멤버 함수를 호출하거나 속성에 간단히 접근할 수 있음
예제)

class Person{
  String? name;
  int? age;

  void setA(int x){
    this.age = x;
  }

  //속성값 출력 함수
  void show(){
    print(this.age);
    print(this.name);
  }
}

void main(){
  Person p1 = new Person();

  p1.age = 20;
  p1.name = 'John';
  p1.show();

  p1..name = 'Jamie';
  p1..setA(30);
  p1..show();
}
셔플 함수

void main(){
  var test = List<int>.generate(45, (i)=>i+1)..shuffle();

  print(test);
}
여기서 6개의 함수만 뽑아야함
> sublist 사용

> 인자값으로 가지고 있는 start와 end 주의
List들의 인덱스. start는 0일 때, 첫번째 인덱스 가르키는 것 맞음 ㅇㅇ
하지만 end는 -1 해야함. 즉 end 10 이라면 인덱스는 9를 가르키는 것
(간단히 불러올 갯수라고 생각하면 편할듯)
sublist(2, 5) >>> List index 2부터 시작해서 5개를 불러오는 것


void main(){
  var test = (List<int>.generate(45, (i)=>i+1)..shuffle()).sublist(0,6);

  print(test);
}
List.generate 이용해서 추첨 프로그램 수정
import 'dart:math';

List<int> lottoNumber(){

  var number = (List<int>.generate(45, (index)=> ++index)..shuffle()).sublist(0,6);

  print('당첨번호');
  print(number);

  return number;
}

List<int> myNumber(){

  var number2 = (List<int>.generate(45, (index)=> ++index)..shuffle()).sublist(0,6);

  print('내 추첨번호');
  print(number2);

  return number2;
}

void checkNumber(List<int> number, List<int> number2){

  int match = 0;

  for(int lotto in number){

    for(int mynum in number2){
      if(lotto == mynum){
        match++;
        print('당첨번호: $mynum');
      }
      //print('로또번호 = $lotto');
      //print('내 추첨번호 = $mynum');
    }
  }

  print('$match개의 당첨번호가 있습니다.');
}

void main(){
  List<int> lottoFinal = lottoNumber();
  List<int> myFinal = myNumber();

  checkNumber(lottoFinal, myFinal);
}
List.generate 인자값 2개,
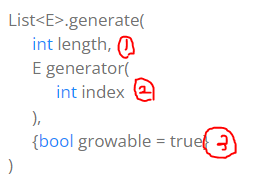
1) 길이
2) 생성된 요소들의 인덱스
3) generate에 의해서 생성되는 리스트 growable = 길이가 늘어날 수 있음
~ (i) => i++ ~ 는 1에서 44까지 (후위연산자)
~ (i) => ++i ~ 는 1에서 45까지 (전위연산자)
조금 매운맛 12 Future-async 심화학습
Thread
- 프로세스 내에서 실행되는 흐름의 단위
- 프로세스 내에서 실직적인 앱의 동작을 담당하는 것
Process 와 Program
| Process | Program |
| 생명이 있는 것 | 생명이 없는 것 예) 포토샵을 컴퓨터에 설치 했을 때, 그냥 존재만 하는 것. |
| 예) 포토샵이 실행되었을 때부터 Process라고 함 | 실행명령어가 묶여있는 데이터 묶음 예) 포토샵을 더블클릭해야 프로그램이 실행됨. 즉, 더블클릭으로 실행명령어가 실행되면서 포토샵 내에 있는 데이터(여러 기능)들을 사용할 수 있음 |
> 생명은 걍 움직이는거? 데이터를 처리하는거? 라고 하자^^...
- Dart는 싱글 스레드로 운영되는 언어
(싱글 스레드 : 한번에 오직 하나의 작업만 실행, 이 작업이 끝나기 전까진 다른 작업들은 개입할 수 없음)
Event loop
- 플러터를 실행하는 순간 isolate라는 스레드 프로세스가 생성되고 즉시 작업 시작
> 전체 총괄하는 단일 스레드
스레드가 생성될때 dart는 3가지 작업을 함
1) First In First Out(FiFo) (Queue 큐) 방식으로 "MicroTask와 Event" 준비
2) main 함수 실행
3) Event loop 실행
Dart는 단일 스레드가 실행되는 동안 내부적으로 Event loop 프로세스를 통해서 순서대로 대기열에 있는 MicroTask와 Event를 처리함
MicroTask : Event queue로 넘어가기전에 짧은 시간동안 비동기적으로 실행되고 끝나는 작은 작업
- MicroTask가 없다면 Event loop는 외적으로 전달되는 Gesture -> drawing -> reding files -> fetching data -> button tap 등과 더불어 Future -> Stream 을 순서대로 처리함
- 외적인 이벤트가 발생하면 관련된 코드들이 이벤트 큐에 등록됨.
Future
: 비동기 방식으로 미래의 어느 시점에 완성되어 실제적인 데이터가 되거나 에러를 반환하는 객체
- 코드상에서 future를 객체화 시키면
1) 다트에 의해서 future 객체가 내부적인 배열에 등록
2) future 관련해서 실행되어야 하는 코드들이 이벤트 큐에 등록
3) 영수증처럼 불완전산 future 객체가 반환됨
4) Synchronous 방식으로 실행되어야 할 코드들을 먼저 실행 ***중요
5) 최종적으로 실제적인 data 값이 future 객체로 전달됨
출력 순서
void main() {
  print('Before the Future');
  Future((){
    print('Running the Future');
  }).then((_){
    print('Future is complete');
  });
  print('After the Future');
}
1) 실행되는 순서대로 제일 먼저 출력
print('Before the Future');2) 다음 future()를 만나게 됨.
Async 방식으로 처리되는 방식이기에 이벤트 큐에 다음 코드가 등록됨.
print('Running the Future');
그리고 잠시후에 처리하기 위해서 건너뜀
3) then 역시도 futrue가 실행된 이후에 처리 되어야함으로 건너뜀
print('Future is complete');하지만 then은 이벤트가 아니므로 이벤트 큐에 등록되지 않음
4) 제일 밑에 sync 방식으로 처리 되는 마지막 코드 실행되어 출력
print('After the Future');5) sync방식으로 처리되는 코드가 더이상 없음
> event loop는 이벤트 큐에서 future 관련 코드들을 가져와 실행
print('Running the Future');6) then 함수 실행
print('Future is complete');
Future는 순차적으로 진행되는 sync 방식을 처리되지 않고 Event loop를 통해서 Event queue에서 선입선출 방식으로 처리되는 하나의 이벤트
Async method
1) 메서드를 통해서 나오는 결과물은 future
2) Await 키워드를 만날때까지 synchronous 방식으로 코드처리
3) await 키워드를 만나면 future가 완료될때까지 대기
4) future가 완료 되자마자 그 다음 코드들을 실행
String createOrderMessage(){
  var order = fetchUserOrder();		// 3)
  return 'Your order is: $order';	// 4)
}

Future<String> fetchUserOrder(){
  return Future.delayed(
    Duration(seconds: 2),		 // 5)
    ()=>'Large Latte',
  );
}

void main(){
  print('Fetching user order...');	// 1)
  print(createOrderMessage());		// 2)
}예상 순서
1) 메세지 출력
2) createOrderMessage 함수의 리턴값 출력
3) order 변수에 fetchuserorder 함수 대입
4) order 값을 포함해서 리턴
5) Future 타입의 fetchuserorder 함수는 2초후에 large latte 리턴

하지만 예상한대로 안 나옴
왜냐하면 main()에서 createOrderMessage 함수가 호출되는 과정에서 order 변수에 fetchuserorder 함수의 리턴값이 할당되어야하는데 실질적으로 fetchuserorder 함수에서 리턴되는 String 데이터는 2초를 기다려야 해서
즉, String 데이터 값이 전달되기 전에 미완성의 future 값이 order 변수에 할당되어서
여기서 필요한 것이 async 키워드임
Future<String> createOrderMessage(){> createOrderMessage 함수의 리턴값은 비동기 방식으로 실행된 결과 + String 방식으로 리턴해야하기 떄문에 Future<String>으로 수정
Future<String> createOrderMessage() async{> order 변수에 fetchuserorder 함수의 리턴값을 할당해주려면 즉시 할당하는 sync 방식이 아니라 기다렸다가 값이 전달되면 할당하는 비동기 방식이어야 함. createOrderMessage가 비동기 방식으로 처리되어야한다고 dart에서 알려주기 위해서 async를 붙임
var order = await fetchUserOrder();> fetchuserorder 함수의 실행이 끝나기 전까지 기다렸다가 할당해야하기 때문에 await 추가
void main() async{> main 함수에서 호출되는 createOrderMessage가 비동기 방식으로 처리되는 함수이므로 main 함수도 비동기 방식으로 동작되는 함수가 됨. 그러므로 async 붙여줌
print(await createOrderMessage());> createOrderMessage 함수의 리턴값이 할당될때까지 기다려야하기 때문에 await 추가

전체코드
Future<String> createOrderMessage() async{

  print('synchronous');
  var order = await fetchUserOrder();
  return 'Your order is: $order';
}

Future<String> fetchUserOrder(){
  return Future.delayed(
    Duration(seconds: 2),
    ()=>'Large Latte',
  );
}

void main() async{
  print('Fetching user order...');
  print(await createOrderMessage());
}
async
- future 키워드를 대신하는 것이 아니라 비동기 방식으로 실행되는 함수라는 것을 dart에서 알리는 키워드
- await 키워드와 함께 어느 미래의 시점을 기다리는 키워드.
future
- 하나의 객체로서 객체가 생성되는 순간에는 미완성으로 존재하다가 미래의 어느 시점에 데이터를 전달 받은 온전한 객체가 되거나 문제가 발생하면 에러를 반환하는 객체
심화 학습
void main() async {
  methodA();
  await methodB();
  await methodC('main');
  methodD();
}

methodA(){
  print('A');
}

methodB() async {
  print('B start');
  await methodC('B');
  print('B end');
}

methodC(String from) async {
  print('C start from $from');

  Future((){
    print('C running Future from $from');
  }).then((_){
    print('C end of Future from $from');
  });

  print('C end from $from');
}

methodD(){
  print('D');
}해설
| 위치 및 실행 | 출력 | 이벤트 큐 |
| 1) main()의 methodA() 실행 | 2) 'A' 출력 | |
| 3) main()의 methodB() 실행 | 4) 'B start' 출력 | |
| 5) methodB()의 methodC('B') 실행 | 6) 'C start from B' 출력 | |
| 7) methodC(B)의 Future()가 이벤트큐에 등록 | 'C running Future from B', 'C end of Future from B' |
|
| 8) 'C end from B' 출력 | 'C running Future from B', 'C end of Future from B' |
|
| 9) methodB()로 돌아와서 | 10) 'B end' 출력 | 'C running Future from B', 'C end of Future from B' |
| 11) main()의 methodC('main') 실행 | 12) 'C start from main' 출력 | 'C running Future from B', 'C end of Future from B' |
| 13) methodC('main')의 Future()가 이벤트 큐에 등록 | (위가 first) 'C running Future from B', 'C end of Future from B' 'C running Future from main', 'C end of Future from main' |
|
| 14) 'C end from main' 출력 | 'C running Future from B', 'C end of Future from B' 'C running Future from main', 'C end of Future from main' |
|
| 15) main()으로 돌아와서 methodD() 실행 | 16) 'D' 출력 | 'C running Future from B', 'C end of Future from B' 'C running Future from main', 'C end of Future from main' |
| ~ Synchronous 방식으로 처리될 코드 모두 처리됨 ~ | 'C running Future from B', 'C end of Future from B' 'C running Future from main', 'C end of Future from main' |
|
| ~ event loop가 이벤트 큐에 쌓인 이벤트 처리 ~ | 'C running Future from B', 'C end of Future from B' 'C running Future from main', 'C end of Future from main' |
|
| 17) 'C running Future from B', 출력 | 'C end of Future from B' 'C running Future from main', 'C end of Future from main' |
|
| 18) 'C end of Future from B' 출력 | 'C running Future from main', 'C end of Future from main' |
|
| 19) 'C running Future from main' 출력 | 'C end of Future from main' | |
| 20) 'C end of Future from main' 출력 | ||
| ~ 끝 ~ |
기본 코드
import 'package:flutter/material.dart';

void main() {
  runApp(MyApp());
}

class MyApp extends StatelessWidget {
  @override
  Widget build(BuildContext context) {
    return MaterialApp(
      title: 'Future',
      theme: ThemeData(primarySwatch: Colors.blue),
      home: Home(),
    );
  }
}

class Home extends StatefulWidget {
  @override
  _HomeState createState() => _HomeState();
}

class _HomeState extends State<Home> {
  String result = 'no data found';

  @override
  Widget build(BuildContext context) {
    return Scaffold(
      appBar: AppBar(
        title: Text('Future test'),
        centerTitle: true,
      ),
      body: Center(
        child: Padding(
          padding: EdgeInsets.all(30.0),
          child: Column(
            mainAxisAlignment: MainAxisAlignment.center,
            children: <Widget>[
              ElevatedButton(
                onPressed: () {},
                child: Padding(
                  padding: EdgeInsets.all(8.0),
                  child: Text(
                    'Future test',
                    style: TextStyle(fontSize: 20.0),
                  ),
                ),
              ),
              SizedBox(
                height: 20.0,
              ),
              Text(
                result,
                style: TextStyle(fontSize: 20.0, color: Colors.redAccent),
              ),
            ],
          ),
        ),
      ),
    );
  }
}
futureTest 함수 생성
void futureTest(){
    Future.delayed(Duration(seconds: 3))
        .then((value){
          setState(() {
            this.result = 'The data is fetched';
          });
    });
    print('Here comes first');
  }
}
버튼에 futureTest 함수 불러오기
ElevatedButton(
  onPressed: () {
    futureTest();
},> 콘솔창에 'here comes first' 출력 후, 애뮬레이터에서 'the data is fetched' 출력
async 키워드 추가
  Future<void> futureTest() async{
    await Future.delayed(Duration(seconds: 3))
        .then((value){
      print('Here comes second');
          setState(() {
            this.result = 'The data is fetched';
            print(result);
            print('Here comes third');
          });
    });
    print('Here comes first');
    print('Here is the last one');
  }
}> await 키워드를 통해 future.delayed가 끝날때까지 3초 기다림
> then 메소드 실행 되면서 'Here comes second' 출력
> setState 메소드 실행 this.result 변수에 'The data is fetched' 할당
> 'The data is fetched' 출력
> 'Here comes third' 출력
> 'Here comes first' 출력
> 'print('Here is the last one' 출력
futureTest 함수에 myFuture 함수 만듦
Future<String> myFuture() async {
  await Future.delayed(Duration(seconds: 2));
  return 'another Future completed';
}
UI 상으로 리턴된 future<String>값을 글릴땐 futureBuilder를 사용

Divider( // 구분선
  height: 20.0,
  thickness: 2.0, //두께
),
FutureBuilder(
    future: myFuture(),
    builder: (context, snapshot) { //snapshot : 특정시점의 데이터 복사해서 보관
      if (snapshot.connectionState == ConnectionState.done) { // future가 완료된 상태
        return Text(
          snapshot.data.toString(),
          style: TextStyle(
            fontSize: 20.0,
            color: Colors.blue,
          ),
        );
      }
      return CircularProgressIndicator(); //데이터 수신중
}),** snapshot.data 하면 오류가 뜰텐데 다음 사진 참조

전체코드
import 'package:flutter/material.dart';

void main() {
  runApp(MyApp());
}

class MyApp extends StatelessWidget {
  @override
  Widget build(BuildContext context) {
    return MaterialApp(
      title: 'Future',
      theme: ThemeData(primarySwatch: Colors.blue),
      home: Home(),
    );
  }
}

class Home extends StatefulWidget {
  @override
  _HomeState createState() => _HomeState();
}

class _HomeState extends State<Home> {
  String result = 'no data found';

  @override
  Widget build(BuildContext context) {
    return Scaffold(
      appBar: AppBar(
        title: Text('Future test'),
        centerTitle: true,
      ),
      body: Center(
        child: Padding(
          padding: EdgeInsets.all(30.0),
          child: Column(
            mainAxisAlignment: MainAxisAlignment.center,
            children: <Widget>[
              ElevatedButton(
                onPressed: () {
                  futureTest();
                },
                child: Padding(
                  padding: EdgeInsets.all(8.0),
                  child: Text(
                    'Future test',
                    style: TextStyle(fontSize: 20.0),
                  ),
                ),
              ),
              SizedBox(
                height: 20.0,
              ),
              Text(
                result,
                style: TextStyle(fontSize: 20.0, color: Colors.redAccent),
              ),
              Divider( // 구분선
                height: 20.0,
                thickness: 2.0, //두께
              ),
              FutureBuilder(
                  future: myFuture(),
                  builder: (context, snapshot) { //snapshot : 특정시점의 데이터 복사해서 보관
                    if (snapshot.connectionState == ConnectionState.done) { // future가 완료된 상태
                      return Text(
                        snapshot.data.toString(),
                        style: TextStyle(
                          fontSize: 20.0,
                          color: Colors.blue,
                        ),
                      );
                    }
                    return CircularProgressIndicator(); //데이터 수신중
                  }),
            ],
          ),
        ),
      ),
    );
  }

  Future<void> futureTest() async{
    await Future.delayed(Duration(seconds: 3))
        .then((value){
      print('Here comes second');
          setState(() {
            this.result = 'The data is fetched';
            print(result);
            print('Here comes third');
          });
    });
    print('Here comes first');
    print('Here is the last one');
  }

  Future<String> myFuture() async {
    await Future.delayed(Duration(seconds: 2));
    return 'another Future completed';
  }

}'공부 > Flutter' 카테고리의 다른 글
| Flutter 스터디 22 날씨 앱 만들기 (widget lifecycle, API, Exception handling, Http pacage, Json parsing) (0) | 2023.02.16 |
|---|---|
| Flutter 스터디 21 Flutter 2.0과 Null safety 널 세이프티 (0) | 2023.02.13 |
| Flutter 스터디 19 Future, async, awite, AndroidX migration (0) | 2023.02.09 |
| Flutter 스터디 18 final 변수와 const 변수, 코드 리팩토링(refactoring) (0) | 2023.02.09 |
| Flutter 스터디 17 로그인과 주사위 게임 플러트앱 만들기 (1) | 2023.02.06 |