
조금 매운맛 3 로그인과 주사위 게임 앱 pt 1, 2


전체코드
// main.dart
import 'package:flutter/material.dart';
import 'dice.dart';
void main() => runApp(MyApp());
class MyApp extends StatefulWidget {
@override
State<MyApp> createState() => _MyAppState();
}
class _MyAppState extends State<MyApp> {
@override
Widget build(BuildContext context) {
return MaterialApp(
debugShowCheckedModeBanner: false,
title: 'Dice game',
home: LogIn(),
);
}
}
class LogIn extends StatefulWidget {
@override
State<LogIn> createState() => _LogInState();
}
class _LogInState extends State<LogIn> {
TextEditingController controller = TextEditingController();
TextEditingController controller2 = TextEditingController();
@override
Widget build(BuildContext context) {
return Scaffold(
appBar: AppBar(
title: Text('Log in'),
backgroundColor: Colors.redAccent,
centerTitle: true,
leading: IconButton(
icon: Icon(Icons.menu),
onPressed: (){}
),
actions: <Widget>[
IconButton(
icon: Icon(Icons.search),
onPressed: (){}
),
],
),
body: Builder(
builder: (context) {
return SingleChildScrollView( //입력할시 키보드가 화면을 가릴때, 가린 영역을 스크롤로 볼수 있게 해줌
child: Column(
children: [
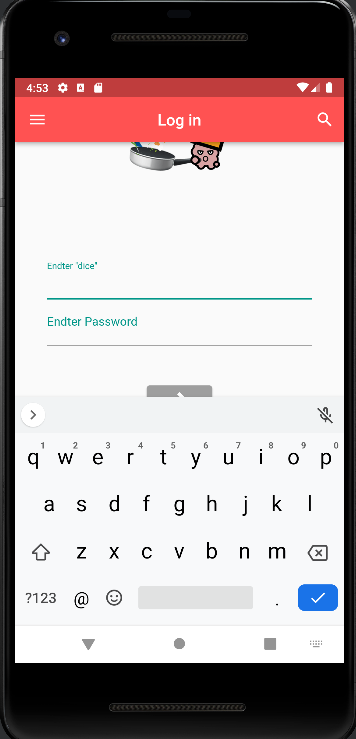
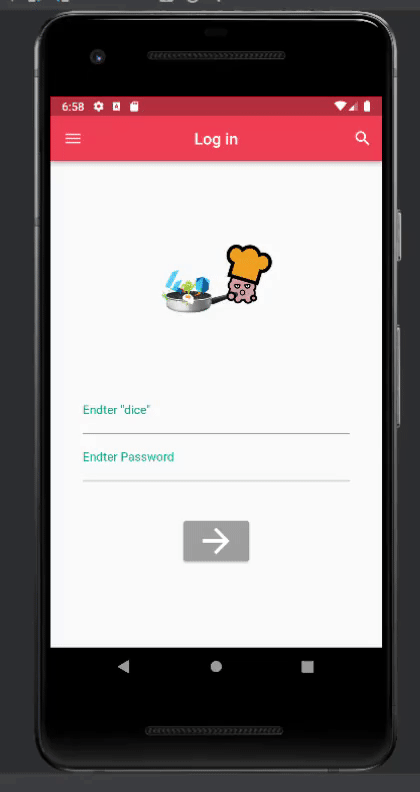
Padding(padding: EdgeInsets.only(top: 50)), // 사진 위 간격
Center(
child: Image(image: AssetImage('image/chef.gif'),
width: 170.0,
height: 190.0,
),
),
Form(
child: Theme(
data: ThemeData(
primarySwatch: Colors.teal, // 텍스트필드 선택 했을때 굵은 선으로 표시
inputDecorationTheme: InputDecorationTheme( // 텍스트 필드 위 설명란을 꾸미기 위한것
labelStyle: TextStyle(
color: Colors.teal,
fontSize: 15.0
),
),
),
child: Container(
padding: EdgeInsets.all(40.0),
child: Column(
children: <Widget>[
TextField(
controller: controller,
decoration: InputDecoration(
labelText: 'Endter "dice"'
),
keyboardType: TextInputType.emailAddress,
),
TextField(
controller: controller2,
decoration: InputDecoration(
labelText: 'Endter Password'
),
keyboardType: TextInputType.text,
obscureText: true, //문자가 표시되지 않게 해줌
),
SizedBox(height: 50.0),
ButtonTheme( // 버튼들을 더 자유롭게 꾸미고 구성할 수 있게 해주는 위젯
minWidth: 100.0,
height: 50.0,
child: ElevatedButton(
style: ElevatedButton.styleFrom(
primary: Colors.grey,
),
child: Icon(
Icons.arrow_forward,
color: Colors.white,
size: 50.0),
onPressed: () {
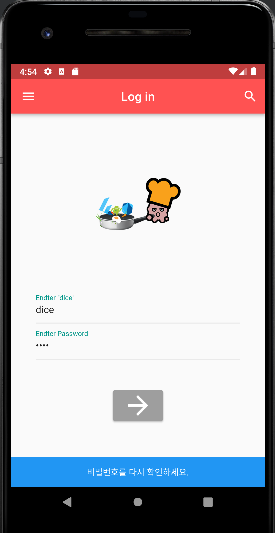
//아이디/비번 모두 맞을때
if (controller.text == 'dice' &&
controller2.text == '1234') {
Navigator.push(context,
MaterialPageRoute(
builder: (BuildContext context) =>
dice())
);
} // 아이디만 맞을떄
else if (controller.text == 'dice' &&
controller2.text != '1234') {
showSnackBar2(context);
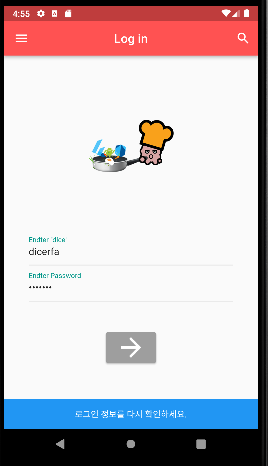
} // 비번만 맞을때
else if (controller.text != 'dice' &&
controller2.text == '1234') {
showSnackBar3(context);
} else { //그외 모든 경우
showSnackBar1(context);
}
},
),
),
],
),
))
)
],
),
);
}
),
);
}
}
void showSnackBar1(BuildContext context){
ScaffoldMessenger.of(context).showSnackBar(
SnackBar(content:
Text('로그인 정보를 다시 확인하세요.',
textAlign: TextAlign.center,),
duration: Duration(seconds: 2),
backgroundColor: Colors.blue,
)
);
}
void showSnackBar2(BuildContext context){
ScaffoldMessenger.of(context).showSnackBar(
SnackBar(content:
Text('비밀번호를 다시 확인하세요.',
textAlign: TextAlign.center,),
duration: Duration(seconds: 2),
backgroundColor: Colors.blue,
)
);
}
void showSnackBar3(BuildContext context){
ScaffoldMessenger.of(context).showSnackBar(
SnackBar(content:
Text('아이디를 다시 확인하세요.',
textAlign: TextAlign.center,),
duration: Duration(seconds: 2),
backgroundColor: Colors.blue,
)
);
}// dice.dart
import 'package:flutter/material.dart';
class dice extends StatelessWidget {
const dice({Key? key}) : super(key: key);
@override
Widget build(BuildContext context) {
return const Placeholder();
}
}
조금 매운맛 3 로그인과 주사위 게임 앱 pt 3
Focus
특정 텍스트 필드가 화면에 나오자마자 입력하도록 입력을 유도하는 기능
autofocus: true- FocusNode : 포커스를 받는 특정 위젯을 식별
- FocusScope : 어떤 위젯들까지 포커스를 받는지 범위를 나타냄
onPerssed : 어떤 버튼을 눌렀을 때 이벤트가 발생
onTap : 버튼을 포함한 다양한 이벤트 구현 시 사용 가능(드래기하기, 두번 누르기 등등)
return GestureDetector(
  onTap: (){
    FocusScope.of(context).unfocus(); // 키보드가 올라와있을때 빈화면을 탭하면 화면에 focus
},> 빈 공간 탭하면 올라와 있던 키보드 해제

body: Center(
  child: Column(
    mainAxisAlignment: MainAxisAlignment.center,
    children: [
      Row(
        mainAxisAlignment: MainAxisAlignment.center,
        children: [
          Image(image: AssetImage('image/dice1.png'),
          width: 300.0,)
        ],
)> 화면에 주사위 이미지 띄우고 정중앙에 배열
매번 이미지를 불러와서 정렬 시키는 등 하나씩 지정해주는 것이 불편하기 때문에
Image.asset 기능을 통해서 쉽게 이미지 불러올 수 있음

Row(
  mainAxisAlignment: MainAxisAlignment.center,
  children: <Widget>[
    Expanded(child: Image.asset('image/dice1.png'))
  ],
)> Expanded 위젯으로 감싸고 있어섯 이미지가 해당 범위를 모두 차지하고 있음

SizedBox(
    width: 100.0,
    height: 60.0,
    child: ElevatedButton(
      style: ElevatedButton.styleFrom(
        primary: Colors.orangeAccent,
      ),
      onPressed: (){},
      child: Icon(Icons.play_arrow),
))> 강의에선 ButtonTheme으로 사이즈 조절 하지만 나는 안되서 SiezedBox 이용.
ElevatedButton으로 바뀐 버전 사용하는 사람들은 siezedBox 사용
랜덤하게 숫자 생성하기
int leftDice = 1;
int rightDice = 1;> 변수 생성
Expanded(child: Image.asset('image/dice$leftDice.png')),
SizedBox(width: 20.0,),
Expanded(child: Image.asset('image/dice$rightDice.png')),> 이미지에도 변수 입력
onPressed: (){
  setState(() {
    leftDice = Random().nextInt(6) + 1;
    rightDice = Random().nextInt(6) + 1;
  });
},> 버튼 누르면 랜덤으로 나오도록 입력,
+1 하는 이유는 컴퓨터언어는 0부터 시작이라 +1 해줘야함
toast 띄우기
(스페이스2번)fluttertoast: ^8.0.9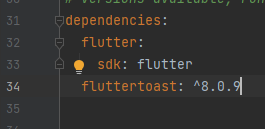
> pubspec.yaml 에 붙여넣기
import 'package:fluttertoast/fluttertoast.dart';> dice.dart에 import
void showToast(String message){
  Fluttertoast.showToast(msg: message,
  backgroundColor: Colors.black,
  toastLength: Toast.LENGTH_SHORT,
  gravity: ToastGravity.BOTTOM);
}> toast 메소드 생성
// main.dart

import 'package:flutter/material.dart';
import 'dice.dart';

void main() => runApp(MyApp());

class MyApp extends StatefulWidget {
  @override
  State<MyApp> createState() => _MyAppState();
}

class _MyAppState extends State<MyApp> {
  @override
  Widget build(BuildContext context) {
    return MaterialApp(
      debugShowCheckedModeBanner: false,
      title: 'Dice game',
      home: LogIn(),
    );
  }
}

class LogIn extends StatefulWidget {
  @override
  State<LogIn> createState() => _LogInState();
}

class _LogInState extends State<LogIn> {

  TextEditingController controller = TextEditingController();
  TextEditingController controller2 = TextEditingController();

  @override
  Widget build(BuildContext context) {
    return Scaffold(
      appBar: AppBar(
        title: Text('Log in'),
        backgroundColor: Colors.redAccent,
        centerTitle: true,
        leading: IconButton(
            icon: Icon(Icons.menu),
            onPressed: (){}
        ),
        actions: <Widget>[
          IconButton(
              icon: Icon(Icons.search),
              onPressed: (){}
          ),
        ],
      ),
      body: Builder(
        builder: (context) {
          return GestureDetector(
            onTap: (){
              FocusScope.of(context).unfocus(); // 키보드가 올라와있을때 빈화면을 탭하면 화면에 focus
            },
            child: SingleChildScrollView( //입력할시 키보드가 화면을 가릴때, 가린 영역을 스크롤로 볼수 있게 해줌
              child: Column(
                children: [
                  const Padding(padding: EdgeInsets.only(top: 50)), // 사진 위 간격
                  const Center(
                    child: Image(image: AssetImage('image/chef.gif'),
                      width: 170.0,
                      height: 190.0,
                    ),
                  ),
                  Form(
                      child: Theme(
                          data: ThemeData(
                            primarySwatch: Colors.teal, // 텍스트필드 선택 했을때 굵은 선으로 표시
                            inputDecorationTheme: const InputDecorationTheme( // 텍스트 필드 위 설명란을 꾸미기 위한것
                              labelStyle: TextStyle(
                                  color: Colors.teal,
                                  fontSize: 15.0
                              ),
                            ),
                          ),
                          child: Container(
                            padding: const EdgeInsets.all(40.0),
                            child: Column(
                              children: <Widget>[
                                TextField(
                                  controller: controller,
                                  decoration: const InputDecoration(
                                      labelText: 'Endter "dice"'
                                  ),
                                  keyboardType: TextInputType.emailAddress,
                                ),
                                TextField(
                                  controller: controller2,
                                  decoration: const InputDecoration(
                                      labelText: 'Endter Password'
                                  ),
                                  keyboardType: TextInputType.text,
                                  obscureText: true, //문자가 표시되지 않게 해줌
                                ),
                                const SizedBox(height: 50.0),
                                ButtonTheme( // 버튼들을 더 자유롭게 꾸미고 구성할 수 있게 해주는 위젯
                                  minWidth: 100.0,
                                  height: 50.0,
                                  child: ElevatedButton(
                                    style: ElevatedButton.styleFrom(
                                      primary: Colors.grey,
                                    ),
                                    child: const Icon(
                                        Icons.arrow_forward,
                                        color: Colors.white,
                                        size: 50.0),
                                    onPressed: () {
                                      //아이디/비번 모두 맞을때
                                      if (controller.text == 'dice' &&
                                          controller2.text == '1234') {
                                        Navigator.push(context,
                                            MaterialPageRoute(
                                                builder: (BuildContext context) =>
                                                    dice())
                                        );
                                      } // 아이디만 맞을떄
                                      else if (controller.text == 'dice' &&
                                          controller2.text != '1234') {
                                        showSnackBar2(context);
                                      } // 비번만 맞을때
                                      else if (controller.text != 'dice' &&
                                          controller2.text == '1234') {
                                        showSnackBar3(context);
                                      } else { //그외 모든 경우
                                        showSnackBar1(context);
                                      }
                                    },
                                  ),
                                ),
                              ],
                            ),
                          ))
                  )
                ],
              ),
            ),
          );
        }
        ),
    );
  }
}

void showSnackBar1(BuildContext context){

  ScaffoldMessenger.of(context).showSnackBar(
    const SnackBar(content:
    Text('로그인 정보를 다시 확인하세요.',
    textAlign: TextAlign.center,),
      duration: Duration(seconds: 2),
      backgroundColor: Colors.blue,
    )
  );
}

void showSnackBar2(BuildContext context){

  ScaffoldMessenger.of(context).showSnackBar(
      const SnackBar(content:
      Text('비밀번호를 다시 확인하세요.',
        textAlign: TextAlign.center,),
        duration: Duration(seconds: 2),
        backgroundColor: Colors.blue,
      )
  );
}

void showSnackBar3(BuildContext context){

  ScaffoldMessenger.of(context).showSnackBar(
      SnackBar(content:
      Text('아이디를 다시 확인하세요.',
        textAlign: TextAlign.center,),
        duration: Duration(seconds: 2),
        backgroundColor: Colors.blue,
      )
  );
}
// dice.dart

import 'package:flutter/material.dart';
import 'dart:math';
import 'package:fluttertoast/fluttertoast.dart';

class dice extends StatefulWidget {
  const dice({Key? key}) : super(key: key);

  @override
  State<dice> createState() => _diceState();
}

class _diceState extends State<dice> {
  int leftDice = 1;
  int rightDice = 1;

  @override
  Widget build(BuildContext context) {
    return Scaffold(
      backgroundColor: Colors.redAccent,
      appBar: AppBar(
        backgroundColor: Colors.redAccent,
        title: Text('Dice game'),
      ),
      body: Center(
        child: Column(
          mainAxisAlignment: MainAxisAlignment.center,
          children: <Widget>[
            Padding(
              padding: EdgeInsets.all(32.0),
              child: Row(
                children: <Widget>[
                  Expanded(child: Image.asset('image/dice$leftDice.png')),
                  SizedBox(width: 20.0,),
                  Expanded(child: Image.asset('image/dice$rightDice.png')),
                ],
              ),
            ),
            SizedBox(
              height: 60.0,
            ),
            SizedBox(
                width: 100.0,
                height: 60.0,
                child: ElevatedButton(
                  style: ElevatedButton.styleFrom(
                    primary: Colors.orangeAccent,
                  ),
                  onPressed: (){
                    setState(() {
                      leftDice = Random().nextInt(6) + 1;
                      rightDice = Random().nextInt(6) + 1;
                    });
                    showToast("Left dice: $leftDice, Right dice: $rightDice");
                  },
                  child: Icon(Icons.play_arrow,
                  size: 50.0),
                ))
          ],
        ),
      ),
    );
  }
}

void showToast(String message){
  Fluttertoast.showToast(msg: message,
  backgroundColor: Colors.black,
  toastLength: Toast.LENGTH_SHORT,
  gravity: ToastGravity.BOTTOM);
}'공부 > Flutter' 카테고리의 다른 글
| Flutter 스터디 19 Future, async, awite, AndroidX migration (0) | 2023.02.09 |
|---|---|
| Flutter 스터디 18 final 변수와 const 변수, 코드 리팩토링(refactoring) (0) | 2023.02.09 |
| Flutter 스터디 16 Stateful Widget (0) | 2023.02.05 |
| Flutter 스터디 15 반응형 레이아웃 (0) | 2023.02.02 |
| Flutter 스터디 14 ListView에서 데이터 전달하고 페이지 이동하기 (1) | 2023.02.02 |